

How to make kefir
Milk kefir is super easy to make and is what we believe to be the most potent source of probiotic! Probiotics, as we’ve said before, are absolutely essential for balancing out your digestive system, strengthening your immune system and keeping disease at bay.
During the fermenting process, lactose is broken down by specific enzymes, bacteria, and yeast making it safe to drink for those who are lactose intolerant. The result of this process is the production of many beneficial bacteria strains and enzymes that have numerous health benefits.
If you do not wish to use milk, then you may want to try a non-dairy alternative such as coconut kefir or water kefir, which, although not as nutritious as milk kefir, still have many beneficial bacterial strains to benefit your overall health.
Health benefits of kefir:
- Boosts immunity
- Fights cancer
- Combats all digestive related problems including IBS
- Improves allergies
- Heals skin problems such as acne, eczema, and psoriasis
- Improves symptoms of lactose intolerance
- Improves mood
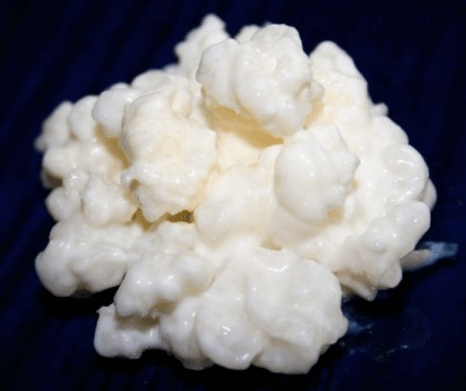
The easiest way to start your kefir growing adventure is to pinch a bit off a friend. Kefir grains grow pretty quickly so scope around for some fellow kefir lovers and see if they’ll give you some.
Otherwise, you can buy online, but make sure you buy active organic live cultures. You can buy a tablespoon for 10 bucks on Amazon! Alternatively, you can purchase live kefir cultures from your local health food or specialty store.
Here’s a quick step by step guide to growing your own kefir once you’ve received your miniature kefir baby!
Have fun!
Step 1
Place your kefir grains into a clean plastic or glass jar.
It is very important that you do NOT use metal utensils when handling the kefir grains as this can contaminate the microorganisms, thus ‘killing’ your kefir baby.
Step 2
Fill the jar with full fat, organic whole milk. A general rule is to use approximately 10 parts milk to one part kefir grains. The bacteria and yeasts within the grains begin to feed on the milk, fermenting the lactose into lactic acid, which is further metabolized by other enzymes and bacteria yeasts. Place a loose lid on the jar, or use a cloth or piece of material with an elastic band to allow breathing space for the fermentation process. Leave in room temperature for 24 hours.
Step 3
After 24 hours your kefir is ready to drink! There are a few ways to drain the kefir. We suggest placing a plastic sieve over a container to drain the kefir. Use a plastic or wooden spoon to stir the kefir around in the sieve so get every last drop! Either drink or store in the refrigerator.
Step 4
Place the kefir back into the jar and top up with milk ready for your next batch. You only need to wash your jar weekly. It is best to keep using your grains daily, which will give the microorganisms enough food to help them stay fresh and healthy. If you are unable to use them every day, then store them in the refrigerator, which slows down the fermentation process.
Please note, in hotter weather, your kefir will ferment at a much faster rate so you may want to keep it in the refrigerator for a while to slow down fermentation.
Kefir tastes a lot like yogurt with an extra tang! If you wish to sweeten the taste we recommend you make smoothies with your favorite fruits! Banana and strawberry kefir smoothie is a particular favorite of ours!

Subscribe To Our Newsletter
Be the first to receive all our news, offers and natural oral health tips and articles.